React Deep Dive - 8 좋은 리액트 코드 작성을 위한 환경 구축하기
React Deep Dive
ESLint 살펴보기
자바스크립트 개발에서 가장 먼저 설정하는 일이 ESLint를 설정하는것이 아닐까 싶다. VSCode에서 쉽게 Extension으로 설치가 가능하다.
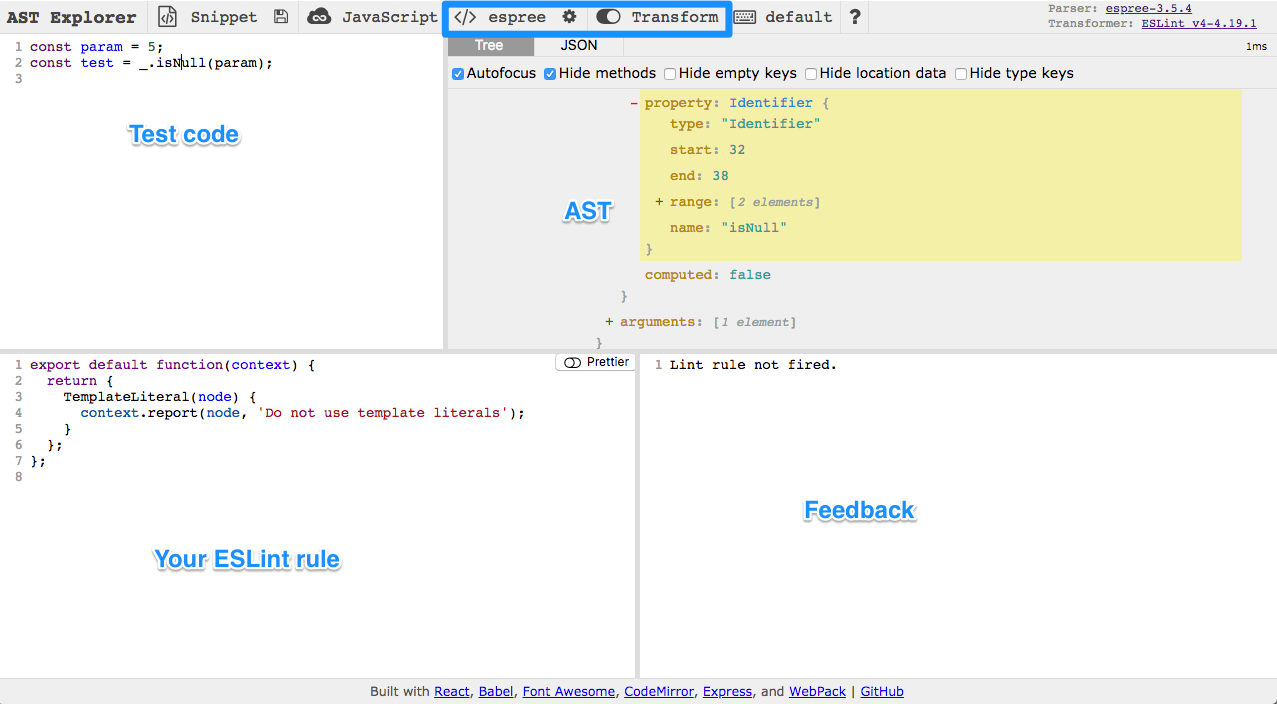
ESLint는 이렇게 코드를 분석한다.
- 자바스크립트 코드를 문자열로 읽는다.
- 자바스크립트 코드를 분석할 수 있는 파서(parser)로 코드를 구조화 한다.
- 2번에서 구조화한 트리를 AST(Abstract Syntax Tree)라 하며 이 구조화된 트리를 기준으로 각종 규틱과 대조한다.
- 규칙과 대조 했을 때 이를 위반한 코드를 알리거나(report) 수정(fix)한다.
2번 과정에서 파서로 espree를 기본 값으로 사용하는데 이는 Json 형태로 구조화된 결과로 분석을 해준다
- https://astexplorer.net/ 여기서 확인이 가능하다!
ESLint를 내 마음대로 설정하여 사용하는 것도 좋지만
기존의 설정인 eslint-plugin과 eslint-config를 사용하면 편리하다 (ESLint 관련 npm 패키지들 예를들어 eslint-config-airbnb )
그렇다면 내 마음대로 어떻게 설정할 수 있을까?
.eslintrc.js 파일을 이용하여 rules를 적용할 수 있다.
아래의 코드는 import React from ‘react’ 가 필요없어짐에 따라 제거하여 번들 양을 줄이는 이점을 얻기위해 추가된 규칙이다.
module.exports = {
  "env": {
      "browser": true,
      "es2021": true
  },
  "extends": "eslint:recommended",
  "parserOptions": {
      "ecmaVersion": "latest",
      "sourceType": "module"
  },

  // rules 추가
  "rules" : {
    'no-restricted-imports':[
      'error',
      {
        paths:[
          {
            name:"react",
            importNames['default'],
            message: "import React from 'react'는 react17부터 더이상 필요하지 않아요."
          },
        ],
      },
    ],
  },
}
한번 설정해 놓으면 매우 유용한데 다만 주의해야할 점이 몇가지 있다.
보통 같이 쓰는 Prettier(코드 정리 extension)과 충돌이 있을 수 있다.
formatting 관련해서 두 extension이 하는 일이 겹치기 때문인데, 해결하는 방법은 규칙을 선언하던가 ESLint 에게 js 분석을 그외 json, markdown 등은 Prettier에 맞기는 방법이 있다.
React Testing Library
테스트란 개발자가 만든 프로그램이 의도한 대로 확인하는 작업이다. 코드의 품질을 올리고 정합성을 검증하는데 유용하다.
React Testing Library 란?
리액트를 테스트 하기 위해 만들어진 DOM Testing Library 이다.
- https://testing-library.com/docs/react-testing-library/intro/
// 리액트 테스팅 메서드 가져오기
import { render, screen } from "@testing-library/react";
// 사용자 상호 작용을 시뮬레이션하는 userEvent 라이브러리는 브라우저에서 상호 작용이 발생했을 때 일어나는 이벤트를 발송합니다.
import userEvent from "@testing-library/user-event";
// jest-dom에서 사용자 지정 jest 매처 추가
import "@testing-library/jest-dom";
// 테스트할 컴포넌트
import Fetch from "./fetch";

test("인사말을 로드하고 표시합니다", async () => {
  // React 요소를 DOM에 렌더링합니다.
  render(<Fetch url="/greeting" />);

  await userEvent.click(screen.getByText("인사말 로드"));
  // 요소를 찾을 수 없을 때 오류를 throw하기 전에 대기합니다.
  await screen.findByRole("heading");

  // jest-dom의 toHaveTextContent를 사용하여 알림 메시지가 올바른지 확인합니다.
  expect(screen.getByRole("heading")).toHaveTextContent("안녕하세요");
  expect(screen.getByRole("button")).toBeDisabled();
});
이런식으로 테스팅을 짜서 FrontEnd 에서 사용하기 적합한 형태로 테스트를 진행할 수 있다. 물론 테스트 코드를 짜는데도 공수가 필요하고 시간이 소요된다. 하지만 장기적인 관점에서 봤을 때 버그를 예방하고 문제점을 쉽게 찾는 장점이 소요된 시간을 충분히 보상하고 그를 넘어 결과적으로 시간을 아껴주는 장점이 있기 때문에 사용하는 것을 권장합니다.
리액트는 주로 Component 단위로 개발이 진행되기 때문에 Component 단위로 Testing을 짜는 것을 추천합니다.
Variant
- getBy
getBy* 로 시작하는 쿼리는 조건에 일치하는 DOM 엘리먼트 하나를 선택합니다. 만약에 없으면 에러가 발생합니다.
- getAllBy
getAllBy* 로 시작하는 쿼리는 조건에 일치하는 DOM 엘리먼트 여러개를 선택합니다. 만약에 하나도 없으면 에러가 발생합니다.
- queryBy
queryBy* 로 시작하는 쿼리는 조건에 일치하는 DOM 엘리먼트 하나를 선택합니다. 만약에 존재하지 않아도 에러가 발생하지 않습니다.
- queryAllBy
queryAllBy* 로 시작하는 쿼리는 조건에 일치하는 DOM 엘리먼트 여러개를 선택합니다. 만약에 존재하지 않아도 에러가 발생하지 않습니다.
- findBy
findBy* 로 시작하는 쿼리는 조건에 일치하는 DOM 엘리먼트 하나가 나타날 때 까지 기다렸다가 해당 DOM 을 선택하는 Promise 를 반환합니다. 기본 timeout 인 4500ms 이후에도 나타나지 않으면 에러가 발생합니다.
Queries
ByLabelText
ByLabelText 는 label 이 있는 input 의 label 내용으로 input 을 선택합니다.
<label for="username-input">아이디</label>
<input id="username-input" />

const inputNode = getByLabelText('아이디');
ByPlaceholderText
ByPlaceholderText 는 placeholder 값으로 input 및 textarea 를 선택합니다.
<input placeholder="아이디" />;

const inputNode = getByPlaceholderText("아이디");
ByText
ByText는 엘리먼트가 가지고 있는 텍스트 값으로 DOM 을 선택합니다.
<div>Hello World!</div>;

const div = getByText("Hello World!");

// 참고로, 텍스트 값에 정규식을 넣어도 작동합니다.

const div = getByText(/^Hello/);
- ByAltText ByAltText 는 alt 속성을 가지고 있는 엘리먼트 (주로 img) 를 선택합니다.
<img src="/awesome.png" alt="awesome image" />;

const imgAwesome = getByAltText("awesomse image");
ByTitle
ByTitle 은 title 속성을 가지고 있는 DOM 혹은 title 엘리먼트를 지니고있는 SVG 를 선택 할 때 사용합니다.
title 속성은 html 에서 툴팁을 보여줘야 하는 상황에 사용하곤 합니다.
<p>
  <span title="React">리액트</span>는 짱 멋진 라이브러리다.
</p>

<svg>
  <title>Delete</title>
  <g><path/></g>
</svg>

const spanReact = getByTitle('React');
const svgDelete = getByTitle('Delete');
ByDisplayValue
ByDisplayValue 는 input, textarea, select 가 지니고 있는 현재 값을 가지고 엘리먼트를 선택합니다.
<input value="text" />;

const input = getByDisplayValue("text");
ByRole
ByRole은 특정 role 값을 지니고 있는 엘리먼트를 선택합니다.
<span role="button">삭제</span>;

const spanRemove = getByRole("button");
ByTestId
ByTestId 는 다른 방법으로 못 선택할때 사용하는 방법인데요, 특정 DOM 에 직접 test 할 때 사용할 id 를 달아서 선택하는 것을 의미합니다.
<div data-testid="commondiv">흔한 div</div>;

const commonDiv = getByTestId("commondiv");
주의: camelCase 가 아닙니다. 값을 설정할때 data-testid=”…” 이렇게 설정하셔야합니다. 추가적으로, ByTestId 는 다른 방법으로 선택할 수 없을때에만 사용해야합니다.
- getByLabelText
- getByPlaceholderText
- getByText
- getByDisplayValue
- getByAltText
- getByTitle
- getByRole
- getByTestId
메뉴얼에서 우선적으로 사용해야하는 쿼리들을 정리하였습니다.
Counter 컴포넌트 테스트 코드 작성하기
Counter 컴포넌트를 만들고, 이를 위한 테스트 코드를 작성해봅시다.
먼저 Counter.js 파일을 생성해서 다음 코드를 작성하세요.
src/Counter.js
import React, { useState, useCallback } from "react";

const Counter = () => {
  const [number, setNumber] = useState(0);

  const onIncrease = useCallback(() => {
    setNumber(number + 1);
  }, [number]);

  const onDecrease = useCallback(() => {
    setNumber(number - 1);
  }, [number]);

  return (
    <div>
      <h2>{number}</h2>
      <button onClick={onIncrease}>+1</button>
      <button onClick={onDecrease}>-1</button>
    </div>
  );
};

export default Counter;
그리고, 이 컴포넌트를 App 에서 렌더링하여 잘 작동하는지 확인해보세요.
import React from "react";
import Counter from "./Counter";

const App = () => {
  return <Counter />;
};

export default App;
잘 보여졌나요? 그럼 Counter를 위한 테스트 코드를 작성해보겠습니다.
src / Counter.test.js;
import React from "react";
import { render, fireEvent } from "react-testing-library";
import Counter from "./Counter";

describe("<Counter />", () => {
  it("matches snapshot", () => {
    const utils = render(<Counter />);
    expect(utils.container).toMatchSnapshot();
  });
  it("has a number and two buttons", () => {
    const utils = render(<Counter />);
    // 버튼과 숫자가 있는지 확인
    utils.getByText("0");
    utils.getByText("+1");
    utils.getByText("-1");
  });
  it("increases", () => {
    const utils = render(<Counter />);
    const number = utils.getByText("0");
    const plusButton = utils.getByText("+1");
    // 클릭 이벤트를 두번 발생시키기
    fireEvent.click(plusButton);
    fireEvent.click(plusButton);
    expect(number).toHaveTextContent("2"); // jest-dom 의 확장 matcher 사용
    expect(number.textContent).toBe("2"); // textContent 를 직접 비교
  });
  it("decreases", () => {
    const utils = render(<Counter />);
    const number = utils.getByText("0");
    const plusButton = utils.getByText("-1");
    // 클릭 이벤트를 두번 발생시키기
    fireEvent.click(plusButton);
    fireEvent.click(plusButton);
    expect(number).toHaveTextContent("-2"); // jest-dom 의 확장 matcher 사용
  });
});
이벤트 다루기
여기서 fireEvent() 라는 함수를 불러와서 사용했는데요, 이 함수는 이벤트를 발생시켜줍니다. 사용법은 다음과 같습니다.
fireEvent.이벤트이름(DOM, 이벤트객체);
클릭 이벤트의 경우엔 이벤트객체를 따로 넣어주지 않아도 되지만, 예를 들어서 change 이벤트의 경우엔 다음과 같이 해주어야합니다.
fireEvent.change(myInput, { target: { value: "hello world" } });
#개발자 #프런트엔드 #모던리액트 #리액트 #모던리액트deepdive #위키북스 #전자책

Leave a comment